Correct course setup prevents problems later
Every material, assignment, attendance record, grade, message, and student enrollment depends on the course being created under the correct academic details. Review the setup carefully before adding students or publishing coursework.
The MyNORSU LMS creates a unique course record from the academic information entered by the faculty member. This record is used throughout the LMS, so course setup should reflect the actual subject, section, term, and teaching period.
Do not create duplicate courses
Before creating a new course, check the active and archived course lists. If the correct course already exists, use that course rather than creating a second copy with slightly different details.
The course-creation process
Go to the faculty Courses section and select Create Course.
Select the correct academic unit, subject, section, and term.
Review the generated course code and dates before saving.
Add students, materials, assignments, and other course content.
Before creating the course
Confirm the academic details with the class schedule, program records, or official faculty assignment. Prepare:
Academic unit
The correct campus, college, department, and program connected to the course.
Course identity
The official subject or course code and the correct class section or group.
Academic period
The school year, semester or term, course start date, and course end date.
Student group
The class roster or list of students who should be connected after the course is created.
Use the correct faculty account
The course should be created while signed in to the approved faculty account that will manage it. If the dashboard shows a student role or incorrect identity, correct the account before continuing.
Step 1: Open the Create Course form
Sign in to the MyNORSU LMS
Open lms.mynorsu.social and sign in with the approved faculty account.
Open Courses
Select Courses from the faculty navigation. Review the existing active and archived courses before creating another course.
Select Create Course
Click the Create Course button to open the setup form. Complete the fields from top to bottom because later options may depend on earlier selections.
Step 2: Complete every course field
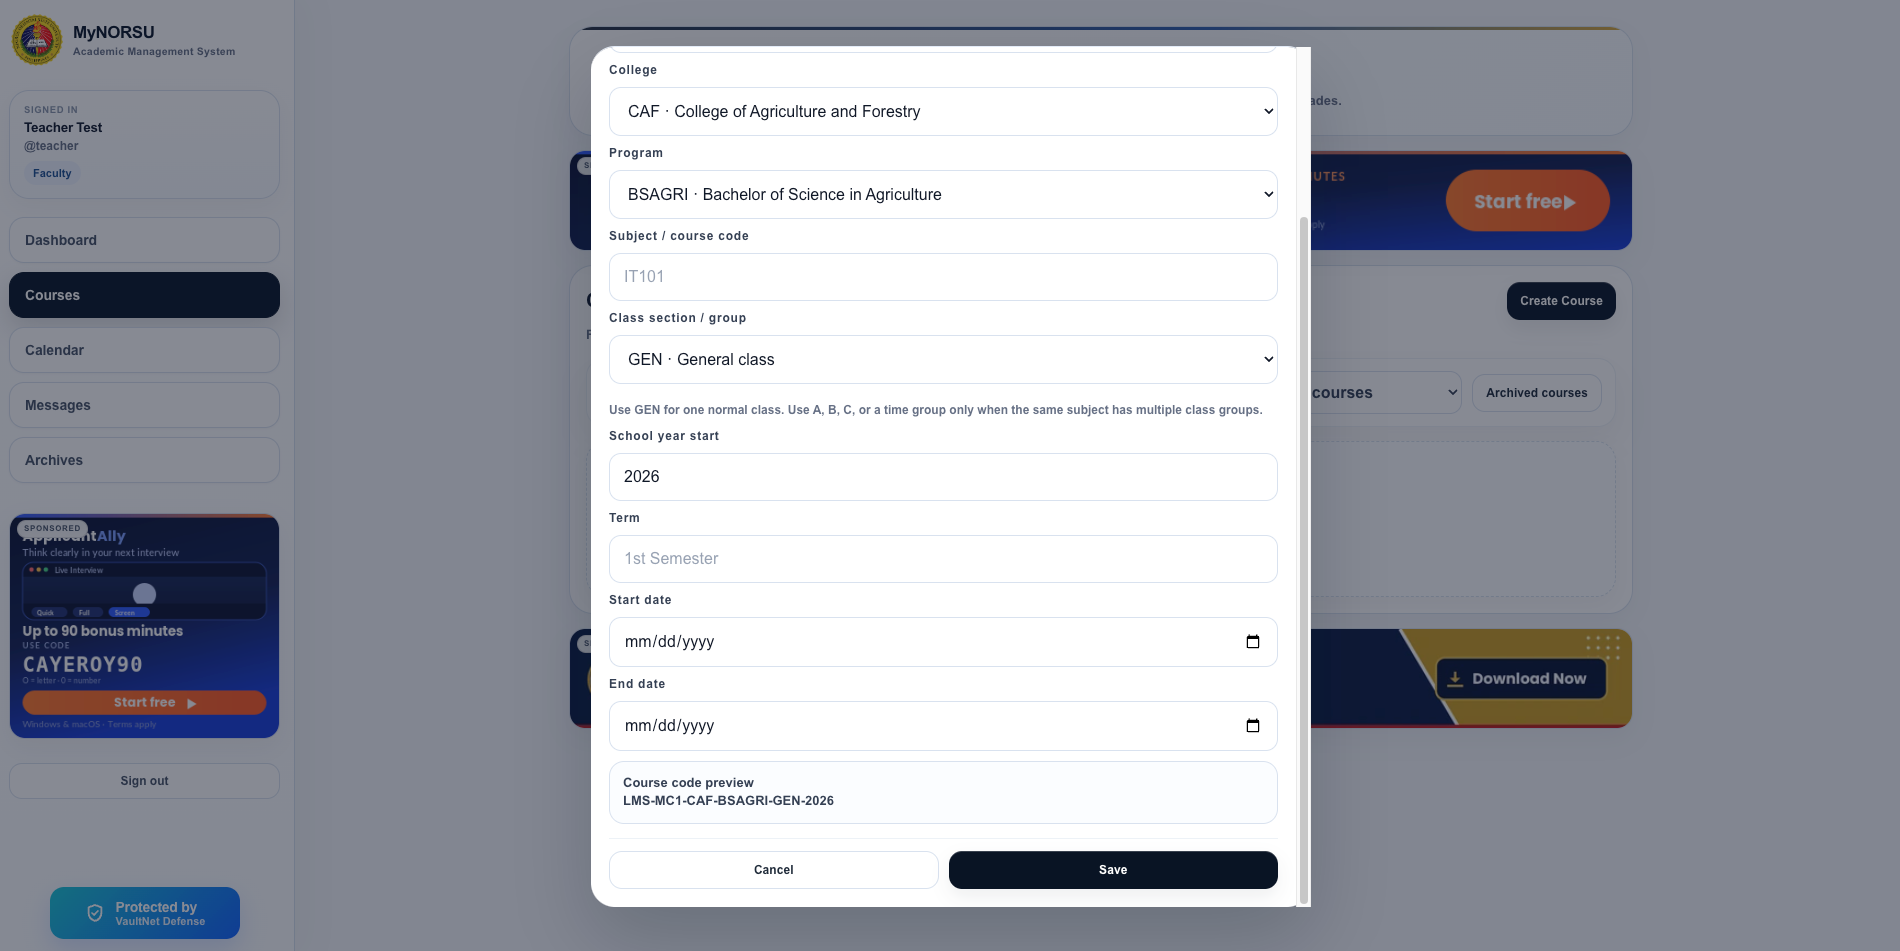
| College | Select the college responsible for the course. Do not choose a nearby or similarly named unit merely to continue. |
|---|---|
| Program | Select the academic program associated with the class. The available programs may depend on the selected college. |
| Subject / course code | Enter the official code used for the subject, such as IT101. Use a consistent format and avoid adding unnecessary spaces. |
| Class section / group | Choose the correct section. Use GEN for one normal class only. Use A, B, C, or another group when the same subject has multiple class groups. |
| School year start | Enter the starting year for the academic period, such as 2026. |
| Term | Select the correct semester or term. Confirm this against the official class schedule. |
| Start date | Choose the date when the course begins. This supports calendars, attendance, and course reporting. |
| End date | Choose the expected end date of the course. Do not set an end date earlier than the start date. |
Step 3: Review the generated course code
The LMS displays a course-code preview based on the selected academic information. Review the preview before saving. It should reflect the campus or LMS prefix, college, program, subject, class group, and year in a consistent order.
Why the course code matters
The generated code helps distinguish similar courses and sections. It may be used in reports, enrollment records, attendance, grades, and troubleshooting, so it should represent the correct class.
If the preview looks incorrect, do not save and edit it later without checking the source fields. Return to the college, program, subject, section, school year, or term field that produced the wrong result.
Step 4: Save the course
Review the full form
Confirm every field, especially the course code, section, school year, term, and dates.
Select Save once
Click Save and wait for the system to finish. Repeated clicks may create confusion or duplicate requests.
Confirm that the course appears
Return to the active Courses list and verify that the new course appears with the correct information.
What to do after creating the course
A newly created course is an academic container. Faculty should prepare it before expecting students to use it.
- Confirm the course title, code, section, term, and dates.
- Add or link the correct students and class roster.
- Add co-teachers when more than one faculty member manages the course.
- Upload the first course materials or orientation information.
- Create assignments only after confirming the correct course and section.
- Set up attendance sessions according to the actual class schedule.
- Check the student view before announcing that the course is ready.
Students cannot see an empty or unlinked course automatically
Creating the course does not guarantee that every student can access it. Students must be connected to the course, and the relevant materials or assignments must be made available.
Common course-creation mistakes
The wrong college or program was selected
Stop before adding students or coursework. Correct the course details or recreate the course properly if the academic unit cannot be changed safely.
The subject code contains inconsistent formatting
Use the official subject code in a consistent form. Avoid extra spaces, decorative characters, or different versions of the same code.
GEN was used for multiple class groups
Use GEN for one normal class only. When the same subject has separate groups, use the correct section or group identifier to keep rosters and records separate.
The start and end dates are incorrect
Incorrect dates can affect calendars, attendance, reports, and course visibility. Compare them with the official academic period before saving.
A duplicate course was created
Do not split students and coursework across both copies. Identify the correct course, move or preserve the required records carefully, and archive the unused duplicate when appropriate.
What to include when requesting course-setup help
- Your full name and faculty account email.
- The campus, college, and program.
- The subject or course code.
- The class section or group.
- The school year and term.
- A screenshot of the form or error with private information hidden.
- A description of what happened when you selected Save.
Send technical concerns to support@mynorsu.social. Never send your password.
Final course-setup check
The course is ready for the next stage when all of the following are true:
- The correct faculty account created the course.
- The college, program, subject code, and section are accurate.
- The school year, term, start date, and end date are correct.
- The generated course code correctly identifies the class.
- The course appears in the active Courses list.
- The correct students, teachers, and course content can now be added.