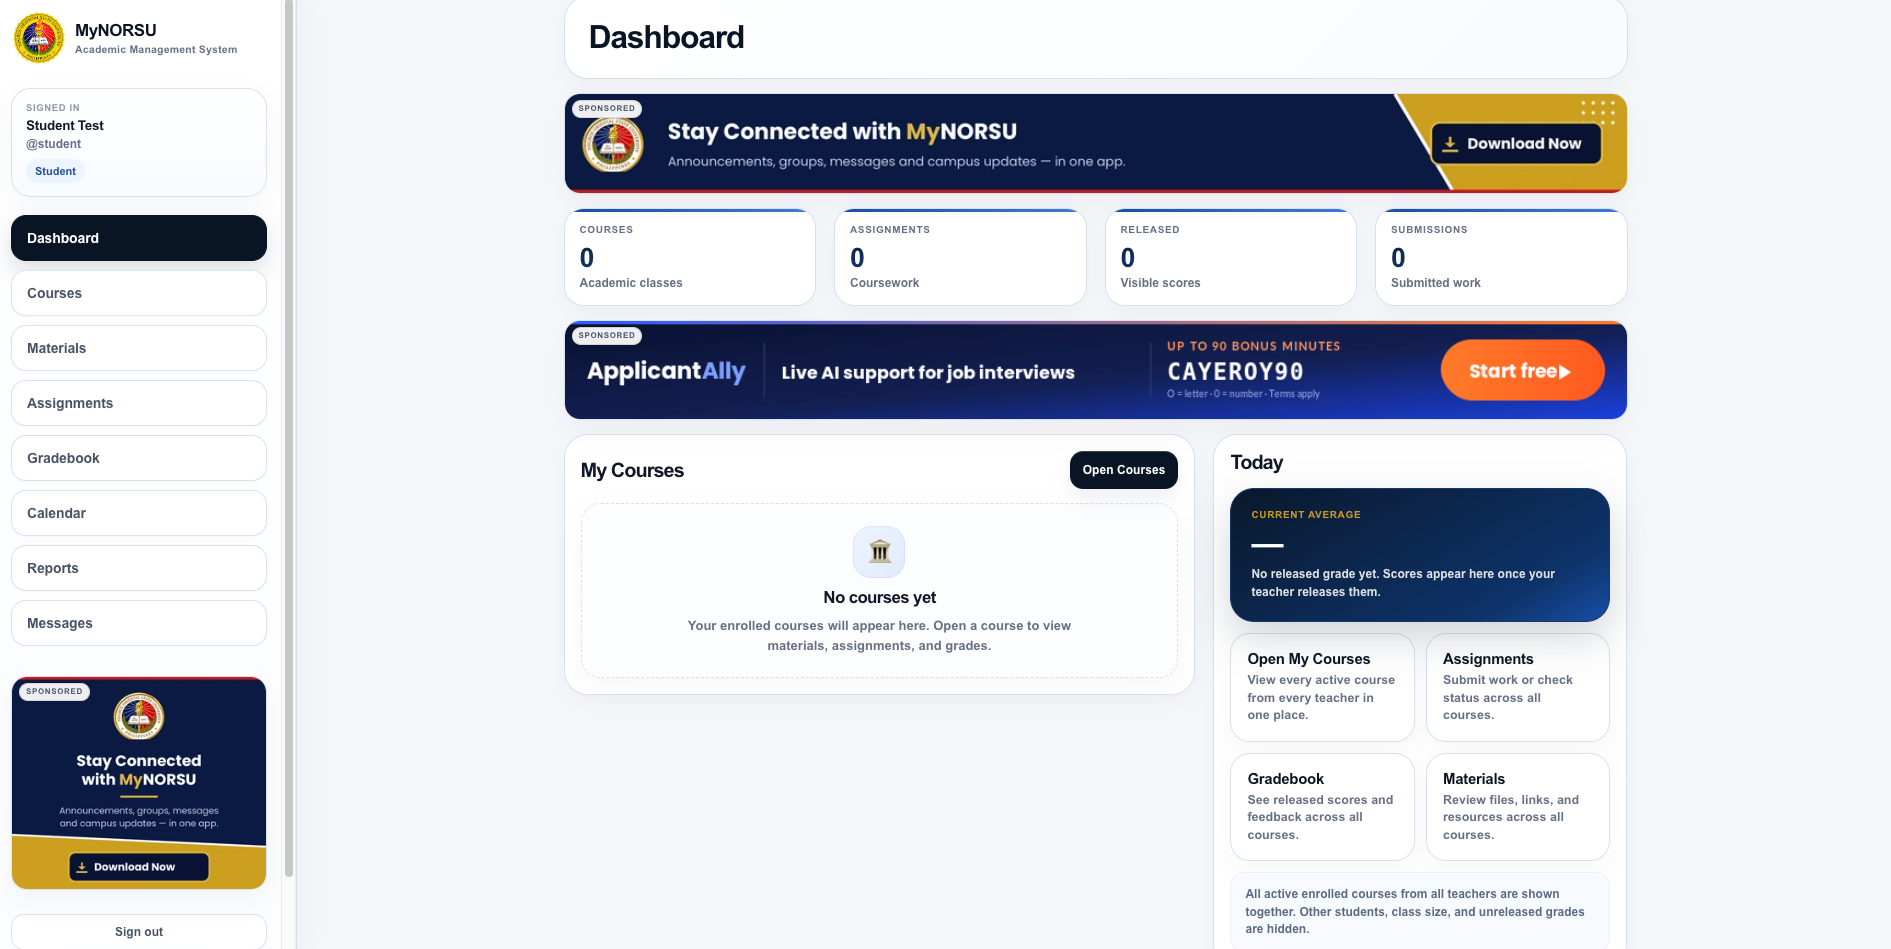
Course access depends on enrollment
Students do not create their own LMS courses. A course becomes visible after a teacher or authorized administrator creates it, publishes it, and connects the correct students or class roster.
The MyNORSU LMS brings course materials, assignments, grades, attendance, calendars, reports, and class messages into one academic dashboard. Signing in successfully is the first step, but the account must also be connected to an active course before that course will appear.
A blank course list does not always mean the LMS is broken
When the dashboard says that there are no courses yet, the student may simply not have been enrolled in an active course. Confirm the course status with the teacher before creating another account or repeatedly resetting the password.
The student course-access process
The student uses a valid and approved MyNORSU account.
The teacher creates and prepares the LMS course.
The student is linked to the correct course or class roster.
The course appears on the dashboard and Courses page.
In MyNORSU, “joining” a course normally means that the student has been enrolled or linked by the teacher or authorized administrator. Students should not expect to enter random course codes or add themselves to courses without authorization.
Step 1: Sign in with your approved MyNORSU account
Open lms.mynorsu.social and use the same email address and password used for MyNORSU Social. A second LMS registration is not required.
Confirm that your MyNORSU account is approved
Pending or incorrectly assigned accounts may not receive the expected student access. Review the account approval guide when your profile is still pending or contains incorrect details.
Use the correct email address and password
Enter the exact credentials connected to the approved account. Do not add spaces before or after the email address, and check capitalization when entering the password.
Check the signed-in identity
The dashboard should show your name and student role. If another person is signed in on a shared device, sign out before continuing.
Step 2: Understand the student dashboard
The dashboard summarizes the main parts of your LMS activity. The exact numbers change according to the courses, assignments, released grades, and submissions connected to your account.
Courses
Shows how many active academic classes are currently connected to the student account.
Assignments
Shows coursework that has been created and made available by teachers.
Released grades
Shows scores that teachers have completed and released for student viewing.
Submissions
Shows work submitted through the LMS and connected to the student account.
The left-side navigation provides direct access to Courses, Materials, Assignments, Gradebook, Calendar, Reports, and Messages. On smaller screens, the same sections may appear in a mobile menu.
Step 3: Find your enrolled courses
Check the My Courses area
Active courses may appear directly on the dashboard. Select the course card or course name to open it.
Open the Courses section
Select Courses in the LMS navigation or use the Open Courses button shown on the dashboard. This displays the active courses connected to your account.
Select the correct course
Confirm the course title, subject, section, teacher, and term before opening materials or submitting work. Similar course names may exist for different sections.
What you may find inside a course
Files, links, readings, presentations, and other learning resources provided by the teacher.
Coursework instructions, due dates, submission requirements, and the status of work you have submitted.
Scores and comments that have been graded and released by the teacher.
Scheduled sessions, deadlines, and other academic dates connected to the course.
Course information and, where available, the students and teachers connected to the class.
What to do when a course is missing
The teacher has not created or published the course
Ask the teacher whether the course is already active in the LMS. A course cannot appear to students before it has been created and made available.
Your account has not been enrolled
Provide the teacher with the exact email address connected to your approved MyNORSU account. The teacher or authorized administrator may need to add or link you to the roster.
You are signed in with the wrong account
Sign out and confirm the email address used for the approved student profile. Courses linked to one account do not automatically appear under another email address.
Your role, campus, program, or section is incorrect
Incorrect profile details can interfere with class linking. Request a correction to the existing account instead of creating a new one.
The course belongs to another term or has been archived
Older or archived courses may not appear among current active courses. Confirm the correct academic term with the teacher.
What to send when requesting course access
A clear request allows the teacher or support team to check the correct account quickly. Include:
- Your full name.
- The exact email address used for MyNORSU.
- Your campus, college, program, and section.
- The complete course title or subject.
- The teacher’s name.
- The academic term or class schedule.
- A screenshot of the missing-course area with private information hidden.
Do not send your password
Teachers and support staff need the email address connected to your account, not your password. Never share passwords or verification codes to request course enrollment.
Good student LMS practices
- Use only your own approved MyNORSU account.
- Check the Courses and Assignments sections regularly.
- Confirm due dates before submitting work.
- Open the correct course and section before uploading files.
- Keep copies of important submissions on your device or cloud storage.
- Read teacher instructions before contacting support.
- Sign out after using a shared computer or device.
Final course-access check
Your course access is correctly set up when all of the following are true:
- Your MyNORSU account is approved and uses the student role.
- You can sign in to the LMS with the same MyNORSU credentials.
- Your correct name appears on the student dashboard.
- Your active courses appear under My Courses or Courses.
- You can open the course and view the materials or assignments released by the teacher.